
When I was pregnant with my daughter, Eden, something overwhelming hit me: I NEEDED TO SEW MY BABY GIRL A WARDROBE FULL OF DRESSES! Little girl dresses 🙂 And thus began my obsession. Dress pattern after dress pattern, there I chugged away on my Pfaff. But my favorite pattern to date is the the Tinny Dress Pattern by Straight Grain Patterns. Here is the reason why I love this pattern: TONS OF VERSATILITY!

Eden strikes a pose with her Teagan White Birch Organics Tinny Dress!
In Kids fashion, it is super important that I stretch my dollar. I really appreciate that this pattern is like getting 2o patterns in one. An, the creator-in-chief over at Straight Grain, has made sure to really pack a ton of options in this dress pattern. For me, right now, Eden is all about the “twirl factor”. I call her my “Twirl Girl” Look at her spin!

This flying arrows Cotton + Steel fabric on the circle skirt really is perfect for the twirl – it looks like arrows flying through the air!
This pattern not only offers a skirt that twirls (Circle Skirt) but there are two other skirt options as well. In fact, there are 8 collar options, 2 bow options, 3 sleeve options, and 2 bodice options! And, can we please just talk about what every sewist wants in a pattern? It is being able to print just the size you need. And that is just the way I like it. With any luck, I’ll have Eden twirling for eight more years to go.
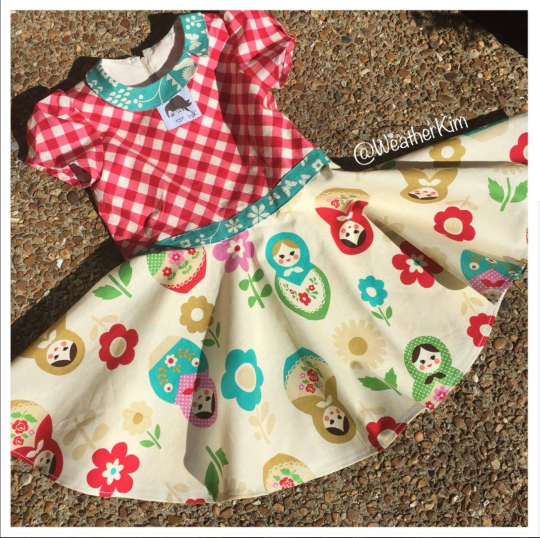
Can’t go wrong with an Asymmetric collar on this Picnic Style Tinny Dress!

Here’s what Eden wore for Easter this year. A Tinny with bunnies and a Tomoka collar.
Have you made a Tinny? What’s your favorite combo? Do you have a little girl dress pattern that you are ga-ga over? Tell me about it! Leave me a comment below. Please follow me on Instagram @WeatherKim to see what I make – would love to connect.
About a week and a half ago, my girlfriend @AmyLouWhoSews (on instagram) asked me to tag along with her to the talented Laura Gunn’s house. Laura’s soon-to-be-released fabric collection called “Vignette” for Michael Miller Fabrics, had arrived and she was busily getting projects sewn up with the fresh stash for promotional uses. So, I grabbed some wire lampshade frames and headed over! Before you knew it, Amy and I were knee-deep in pretty and starting our next challenges using Laura’s array of textiles. It is fascinating to know that all her work starts out as paintings. Here are AmyLouWhoSews and I below in Laura’s living room.

Hanging out in Laura Gunn’s living room cutting into her fresh new fabric line called Vignette.
Once I got home I had my pretty fabrics (“Bouquet Stripe” and “Scattered Posies”) all ready to go and a vintage shade begging to be clothed in them!

They always look so naked when they start off.

Normally I put all the lining fabric on first, but this time I couldn’t wait and had to put some of the “headline” fabric on.

I get the biggest rush seeing my shades lit from behind for the first time. The fabric takes on a whole new dimension.

As I make the shades I am constantly looking ahead and imagining what kind of trim would work with it.

The trim, for me, was rather tough this time. I wanted the fabric to be the star of the show and not look too outline-y. G-Stree Fabrics left me little to pick from and Jo-Anns was closed. It’s amazing what you can think of by watching a little Project Runway! Above is a clearance Infinity Scarf for $4.97.

I fell in love with some blouses at Target. I hated the idea of paying full price for something I was going to cut up. But, I had to have the shirt on the right. Haven’t used it yet, though!

Originally I wanted to trim it with pompoms. My neighbor let me have what she had, but it was only enough to do the corners. Ultimately, I took them out and went in a different direction.

After another trip to JoAnn’s I found this box pleated trim that looked nice with the bottles on the fabric in the crisp white. I also like the “weight” it lends to the base of the shade.

Every maker needs their own label, right?

Ta-da! Doesn’t every lampshade maker drag their dry sink out into the snow with their spring time fabric to do a photo shoot against the snowy landscape???

This shade actually looks great in my daughter, Eden’s, room. I ended up trimming out the rest of the shade with a jute-like twine that blends with the green of the fabric. This allows the fabric to be the main show.

And here is the AH-mazing Laura Gunn chilling on AmyLouWhoSew’s couch with just a few of the projects that were made with her Vignette fabric. She is so nice and encouraging. Just love her!
What do you think? I can’t seem to stop making these shades. If you want to follow my process, just follow me on Instagram (I’m @WeatherKim). I like to post pics of what I am up to every step of the way (and often ask for advice!)
![]()

WOULD YOU LIKE TO LEARN HOW TO MAKE THESE LAMPSHADES?
WANT TO SAVE 10% OFF SUPPLIES?
Read on and I’ll tell you how you can WIN A BEGINNER DVD and where to SOURCE THE SUPPLIES.
A little over ten years ago I was trolling the acres of Brimfield, in Massachusetts looking for my usual diamonds in the rough. Think of Brimfield as endless farmland with countless antique estate sale finds, just begging to hop in your car to be taken home. I came across something unusual, though – beautifully hand-sewn lampshades. They weren’t grimy or tattered, but rather over-the-top AH-mazing! I purchased one from the artist selling them and over the following year, commissioned her to make several more for me.
Here’s a look at the shade that got me hooked:


I studied them closely and tried making my own. I got the hang of it, but I had a problem: other than stumbling across vintage-style wire frames at garage sales and other “picks” across the northeast, I didn’t know where to source the wire frames. Luckily for me, I came across Mary Maxwell and her website: Victorian Lampshade Supply.
Mary has been sewing truly beautiful victorian style lampshades for 38 years and has mastered her craft. Not only does she offer the wire frames for purchase on her website, she also carries the other materials needed for the lining, seams, fabric, trim, beads, and even the lamp bases themselves! But here is the BEST PART: she has created DVD’s to help you learn how to make these one-of-a-kind shades yourself!
Here are just **some** of the lampshades Mary has made. The frames are available for purchase on her website:


I am a sewer who likes to make garments for my baby girl and the occasional quilt. But LAMPSHADES? I can’t stop! If you come from a quilting background, making lampshades are perfect for BUSTING into all those FAT QUARTERS you’ve been hoarding:-) If you start small (with a boudoir style lamp shade), they really don’t require that much fabric. I **do** recommend always sewing the lining fabric in (as boring as it may get) because if you don’t, you are liable to see the lightbulb outline directly through your outer fabric. The lining truly makes the light more diffuse and stops from having an ugly lightbulb appearing through your darling outer fabric.
Here are some “before” and “after” shots of the shades I made over the last 3 weeks.


The larger shade took me about 2 weeks to sew together (a few hours each night after the kiddos went to bed and 2 weekend days). The smaller shade took me about 2 days (16 hours.) I would like to point out that this process would probably go a little faster if I wasn’t a stickler for sewing on the trim. As you will see in Mary’s DVD’s (if you get one) she uses glue for that part and it looks like it saves a lot of time 🙂
So, did I provide enough eye candy for you? Are you ready to get started sewing? I HEAR YOU!! Mary is so cool. She has graciously agreed to let readers of my blog save 10% off their purchase in her store now through March 1st 2015. All you have to do at the checkout is leave “WeatherKimShades” in the comments section of the checkout and she’ll apply it to your purchase (this excludes shipping.) I encourage you to check out this link HERE and HERE and consider purchasing one of Mary’s two beginner lampshade KITS & DVD combos. The kit/dvd combo is awesome because she provides everything you need to make the shade featured in that kit for one low price. Below are the 2 kit/beginner dvd combos available:


Additionally, she has a ton of wire frames, lining fabric, trim, seem binding and other materials to help you on your way. All is located in her online shop HERE.
To top it off, Mary has graciously agreed to give one lucky winner a FREE COPY of her beginner DVD🙂 !! Not to worry, though, if you go ahead and purchase the dvd and end up winning it. She said she’ll give the winner copies of her other 2 DVDs featuring advanced techniques should you have already purchased the beginner one 🙂
HOW TO WIN A COPY of “HOW TO MAKE VICTORIAN STYLE LAMPSHADES” dvd:
- Follow @weatherkim on Instagram (that’s me!)
- You must follow me on Instagram to win AND you must tag 2 friends on Instagram in the comments section of the picture of my Instagram feed featuring this give away.
That picture looks like this:

- Another way you can win is by following @WeatherKim on Instagram AND re-gramming my picture featuring the give-away with the hashtag #WeatherKimShadesGiveaway on your feed. You decide.
I’ll announce the winner on my Instagram feed sometime Monday evening February 9th. Until then, let your fingers do the walking right on over to Mary’s website and bust out that fabric stash – we’ve got some lampshades to make!
![]()
Every summer I retreat to the far northeast reaches of our country with my family to escape the traffic and heat of our Capital Beltway and breath in the fresh pine tree air of Maine. This year, my quest for lobster could only be trumped by my quest for fabric. In part I of this series, I told you all about two adorable modern fabric shops (not too far from each other) along Maine’s “midcoast” region. Today, I’ll tell you about two other places to procure yummy, sewable fiber that are also kind of close to each other: Under the Dogwood Tree in Southwest Harbor and Marden’s in Ellsworth, Maine.
UNDER THE DOGWOOD TREE
SOUTHWEST HARBOR MAINE

Exterior of Under the Dogwood Tree, Southwest Harbor Maine
This shop has all kinds of on-trend items from stationary, apparel, jewelry, dry goods, rugs, artwork, children’s books to a cozy upstairs corner of modern fabric.

Cute upstairs nook of modern fabric
While they don’t have a large selection, what they do have is modern, fresh and current. I love the over-sized wooden spool they use to house some of the bolts.

Mixed throughout the shop (and it is no different in the fabric section) are old and new items. Aren’t these vintage buttons darling?

Looking down the shelves towards the sales section.
Off to the side corner near the stairway is a small section of sale fabric ranging from $4-$6 a yard.

The cute but uneven cutting table
I love the idea of this cutting table. I also appreciate the honor system the owner puts into our hands – allowing us to cut what we need, writing it down on a slip of paper to bring to the checkout downstairs. Unfortunately, the planks on the table are not even so your trip with the rotary cutter skips over fabric during the dips. It gets an A for form but a D for function.

Selection of Heidi Boyd patterns
I noticed a nice selection of Heidi Boyd patterns (who is a local Maine artist) for felted toys. They were so cute! I love it when boutiques carry items from local artisans. Yay!

Love how they display their dry goods. I have a vintage wire hamper and need to make a fabric insert like this one.

Technically, this isn’t just a fabric store. This meteorologist had to grab a cloud collector’s book 😉
MARDEN’S
ELLSWORTH MAINE

Nothing fancy from the outside.
Marden’s is a locally-owned chain of 14 discount supply stores. They exist only in Maine. You will find everything under the sun in this place. I could go on and on about the shoe department alone, but I want to let you in about Maine’s best kept FABRIC secret! Are you sitting down? No? Then go hit the restroom, get yourself a snack, put your phone in airplane mode (unless you’re reading from your phone, of course), hide yourself from your husband-kids-pets-nosy neighbors-whatever distracts you- because I am going to get your fabric seeking radar on HIGH ALERT! Feast your eyes:

Rows and rows of mostly quality fabric from Westminster/Free Spirit, Riley Blake, Andover and so much more…
Now, if you’re looking in the front row of this picture and are like “no great shakes” then I HEAR you. BUT, you did not prowl through each and every bolt of fabric in this joint (don’t forget the bottom shelves on the floor) as I did. Anna Maria Horner ring a bell? CHECK. Denyse Schmidt Chicopee collection anyone? RIGHT OVER HERE, Tula freakin’ PINK??? Ummmm Hmmmmmmm. “Fine” you say. “Fine, my local fabric shop carries that – what’s all the hoopla about?” you say. I’ll tell you:
$1.50 – $5.49 a yard
is what. And that $5.49 was mostly on select Riley Blake fabric (I don’t understand this, but this particular store had a minor crush on Riley Blake (not that there is anything wrong with that) and had all their fabric priced the highest – unless it was in the super-sale section.) I’ll tell you this – I didn’t pay a dime more than $4.50 a yard for my haul. Now, will there be some, let’s say, less desirable fabric you have to weed through? YES. But is it worth it? YES.

Above is a look at their sale section (yes a store who’s prices are less than $5.50 a yard has a sale section.) If you squint you might be able to make out that pink sign that says $2.99 a yard. Below is an example of some of their $1.50/yard fabric.

Marden’s $1.50 / yard Tina Givens fabric. INSANE.
I had baby girl with me that day and I was torn over this vintage-looking rainbow fabric, also for $1.50/yard. (I wish I had gotten it.)

1980’s chic fabric. Should have grabbed it for $1.50/yard – oh well.
Here is some Denyse Schmidt for you. Again, all this was priced between $3.50 & $4.50 a yard:

Bolts of Denyse Schmidt Fabric at affordable prices.
Now, if you’re thinking “No problem, I’ll just give Marden’s a call and order some.” Good luck with that. They don’t ship fabric. They don’t take orders over the phone. So, you’ll have to take that leaf peeping trip this fall to Maine and hop a flight to BGR or PWM (don’t pick the wrong Portland or you’ll end up in Oregon.) Whatever you do, be prepared to spend hours in that place. Remember, I didn’t even go into the shoe department details. You might be wondering “How do they get this stuff?” Well, the inner journalist in me asked and basically one of the examples an employee game me was that there was a fabric store in some other part of the country that had a fire in their bathroom. Insurance company comes in and takes all the inventory away to replace it. The inventory wasn’t damaged at all. Marden’s steps in to buy it all. CHEAP. Thank you, Marden’s.
IF YOU GO:
- Allow a good 2 hours
- Don’t deprive yourself of a lobster roll while in Maine
- Bring me back some whoopie pies (also sold there)
- Store locations: Biddeford, Sanford, Scarborough, Gray, Lewiston, Waterville, Brewer, Lincoln, Calais, Houlton, Ellsworth, Presque Isle and most recently Rumford and Madawaska (and each one’s stock can vary.)
Oh please please PLEASE share your Marden’s victories with me in the comments below. Oh how I love to hear how a good bargain is procured 🙂
![]()

Is it me, or is there a mustache trend out there?
I don’t mean to put JoAnn Fabric down. Let’s face it, it’s the go-to place to buy so many items to feed your quilting-crafting-sewing hunger. Armed with those inevitable 40% off coupons, how can you go wrong? But, I must say, I was never really that enthused about their fabric selection. It tended/tends to be on the traditional (boring) end of the spectrum for me. But every once in a while, something catches my eye. A few weeks ago, after our first fall-like cool-down in the weather pattern, I was jonesing to make something Fall-y. H E L L O BURLAP FABRIC 🙂 Why, you’re not just burlap, you’re burlap with MUSTACHES printed all over you! Come with me to the cutting table why don’t you?
I had just figured out how to install an invisible zipper, so I was on an invisible zipper kick. So a plethora of pillows ensued. Here is how the burlap fabric got transformed:

Sometimes I think the staging of the things I make is as much fun as the creating process.

Mighty pleased at how my invisible zipper turned out. Yay!

This is the back of the mustache pillow. This darker fabric was also used to line behind the front of the burlap. Since the burlap fabric has lots of gaps, I didn’t want the white pillow form to show through.
After Mr. Mustache Pillow came together, I decided he was crying out for a companion. He needed something a little more Halloweenie. Jo-Ann to the rescue again! This time the burlap fabric had spiders all over it. SCORE! I made the throw pillow out of a slightly smaller size (16″ square) and added some piping-ish stuff to the edges (it reminded me of really wide shoelace material – I guess I could get up and go look at what it is called, but I’m sitting on my foot kind of funny and it fell asleep and I don’t want to go through the pins and needles phase, so sorry!) That was the trickiest part – getting the wide (1/2″) shoelace material to be a nice square on the front cover AND go around the edge of my pillow cover peacefully with the invisible zipper. But I channeled my inner Tim Gunn and had a “make it work” moment.

Using burlap novelty fabric, I created these cute throw pillows to add some Fall Decor to my fireplace hearth.
The most annoying part making these pillows? The burlap frays. Really Bad. I was fortunate that my sewing teacher loans me her backup serger. So, what do you think? What tricks do you have up your sleeve to make big seasonal changes on a tight budget? I’d love to hear your ideas 🙂
![]()
So, I have this double baby shower coming up quick this weekend. When I *can*, I like to make hand-made gifts. Obviously, this is something I enjoy, but I also like to give things that are unique and made with love. Thankfully my sewing teacher, Cindy, had just the perfect idea: baby receiving blankets. They are pretty simple to make and don’t take F O R E V E R (like some quilts can!)

Roll ’em up and give ’em! http://www.KimMartucci.com
The baby shower I am going to is for two women. One is expecting a girl and one is expecting a boy. YAY! It also helped that over at Jo-Ann Fabric, their flannel was on sale 🙂 Love love love 60% off! Here are the three I have made so far (I still have to make one more baby girl blanket.) I plan on giving two each.

The first one I made was the pink and brown blanket. I love pink and brown together. I also appreciate how RIPPING YOUR FABRIC (instead of cutting it) keeps your fabric from getting WONKY. You know what I mean? They do this all the time on Project Runway – ripping the fabric. This is when you put a little snip where you want to cut and then tear instead. What happens is that you end up ripping along the grain of the fabric and it gives you a true straight edge. Even better, your blanket will LIE FLAT if it is ripped along the warp and weft threads of the fabric. Good sewing teachers instill this in you and I can say Ms. @CindySews did her job! Here’s how the baby girl blanket turned out below.

Go ahead, slap that sewing label on it. Slap it on everything you make #ImSOvain
 Next up, I made one of little dog fabric. It’s turquoise and brown. I like this combination, too.

Who doesn’t love puppies?
And, finally, my most recent blanket I made to compliment the puppy blanket above. This one, though, is a little more modern. The flannel features buildings. I was actually kind of surprised that Jo-Ann even had this fabric. I find that their selection is rather traditional. So, I kind of did a little jig in the aisle when I found this fabric. I like how it compliments the puppy blanket colors. Also, the orange in it gave me a good excuse to flaunt my tacky Winker Weather Kim label in the orange and turquoise color scheme (note to self: next time you order sewing labels, consider how infrequently you actually use this color scheme despite how much you love it!)

I love the color combo of orange and grey – nice and modern.
So what do you think? Tell me what kind of hand-made baby shower gifts you like to give. I would love some ideas! Drop me a comment below. I’d love to hear from you 🙂
![]()
Ta-da!

It only took me 6 months, but I finally finished Eden’s quilt. I feel guilty because I made a quilt for another cutie-pie first (her baby shower was in December and I knew I wanted to make something.) For Eden’s quilt I wanted to create something with an Anthropologie vibe that was all-over kind of neutral with punches of color.
 As I type, Eden just turned 6 months old. What you don’t know about that picture above is that I plopped her down like twenty times only to have her roll onto her side before I could safely let go and take the picture! You can imagine how happy I was to have her both upright AND smiling!

 I spent the final month of my pregnancy painting Eden’s crib. I found a zero VOC paint at Lowes by Olympic Paint. The color is Calypso Berry and it was that color from which I picked out my fabrics to use in making the quilt. I used a lot of Art Gallery fabrics (seriously, I love LOVE LOVE them!), some Joel Dewberry, & the base is just a neutral Jo-Ann grab. The Art Gallery fabrics are from their Summer Love & Modernology collections by Pat Bravo (this has to be one of the nicest designers around – her videos make you want to jump into the screen with the crew and start dancing!) I hope to meet her at Spring Quilt Market in Portland OR in a few months. (And I am just DYING to meet Bari J! She is one of the newest members of the Art Gallery Team. I’ll be crafting with some of her LillyBelle fabric that I have stockpiled soon (waves to @BariJ !) But back to Eden’s quilt… The Joel Dewberry fabric is from his Aviary 2 collection and is the Woodgrain in the Bark color line that essentially trims out the quilt with the binding.


 Here she is, above, playing with her appliquéd letter “E”. Or she’s thinking about eating her toe. Actually, I am pretty sure it is the second. Thank you to @CindySews for all her help, especially with the appliqué stuff. She is not only my sewing teacher, but also my dear friend. Between Cindy and her friend (now mine), Pam (who owns Delray Fabrics – you should buy all your modern fabrics there. Seriously) I find myself cracking up whenever we’re all together. Got a problem with one of the Real Housewives? Chat about it with Pam – she’ll back you up.

Couldn’t end this without my Sweet Eden’s gummy grin. I hope she reads this one day and knows all the love I put into this hand-made quilt. Baby girl, mommy L O V E S you to the moon and back!

![]()
It all started when I happened upon this laugh-out-loud crafty type’s blog This Portland gal is full of fun & crafty and inspired me to take up some sewing lessons. And that I did. Enter Cindy Luby, quilter & sewer extraordinaire. In no time I was drooling over websites like this, and this, and even this. Little did I know that THIS place existed, and only a few towns over from me! I was on the hunt for F A B R I C. Me loves me some
F A B R I C .

Ladies, you shoe ladies in particular, my fabric addiction is kind of like shoes. Say no more. My first parcel of happy happy joy joy arrived via the nice UPS man and this was my first splurge (look above):
You see those mod umbrellas with the couple underneath? (Love the red shoes), well I knew I had to have that fabric when I saw it in the Dear Stella line. It is called Town & Country Multi Umbrellas. And those red dots just above? It’s from the same line and called Red Raindrops.
Mind you, my original splurge was for making my baby girl (due Sep 15th!) a dress. That is what that little grouping of pink & orange fabrics is at the top. But, sigh, the pattern hadn’t arrived by the time my first sewing lesson was set to begin, so I was just *forced* to make a cute tote for myself. Can you believe that?
So, here are the deets and kind of step by step-ish play by play of the whole sew-a-thon. I regret not instagramming a pic of my sewing instructor, the lovely Cindy Luby of Cindy Luby Designs. Her “Easy Summer Tote” pattern was my top sac of choice for my upcoming trip to Maine.

Straps on & Bottom Attached
The first step was assembling the straps. I used the Red Raindrops contrast fabric for those pieces, as well as the bottom of the bag. Oh yeah, I need to tell you about the INTERFACING – or make that LACK OF INTERFACING. According to the wise Cindy, it is a pain in the you-know-what. Basically, interfacing is the stuff you put behind your fabric to give it some stiffness, so your bag can kind of stand on its own. You have to iron this stuff in and basically it takes a long time and can become a mess for your iron at times. WELL, that is where the FABULOUS Pam of Del Ray Fabrics saves the day. She has this new product that you can sew in behind your fabric that is SO MUCH EASIER TO USE than interfacing called “Soft and Stable“. I believe it is referred to as “interlining”. Think of it as like a thin layer of foamy mattress top. The best part (besides the no-ironing-it-in routine) is that when your fabric bends (as it will around the straps), it won’t get and retain all those wrinkles that make your masterpiece look all dowdy. It also makes your bags look more professional. And, at this stage in the game, I’ll take all the professional I can get!
Once we got the straps sewn into the front and back of the bag and the bottom attached, we had to get the rest of the Soft & Stable attached to the fabric. To do this we had to BASTE the Soft & stable to the fabric before we sewed it in good.
LAME FACT:
I first learned about basting while watching Little House on the Prairie. Ma was chastising Laura for only basting a dress  she was making for Nellie (or some other evil girl.) Oh yeah, whoever it was was going after Almanzo – oh no! Anyway, girly girl ends up wearing the only-basted-dress to the circus with Almanzo and SURE ENOUGH, the thing basically falls apart in front of everyone. So that is basically how I learned that basting is kind of like only a fabric place holder and not something you should trust to wear out in the open…especially if your friend is Laura Ingalls and she offers to sew for you. Heads up.

Making a bag from a rectangle, pinching the corners.

Adding the Magnetic Closure
Once that was all sewn in and our corners sewed up nicely, I have to say that Soft & Stable stuff really made the bag stand up nicely (and it was so light!) The next step was to create the lining. I think Cindy gave me some Moda basic fabric for this in white, but I wasn’t paying real good attention at the time as I was eyeing allll the other fabric she had in her studio. We folded the two main
pieces in half and pressed them so we could decide where to put the magnetic snap. We opted

Making i-phone Friendly Interior Pockets
to insert it about 3/4″ from the top, but in hindsight, Cindy says we should have gone an inch. (Later on, edge stitching the top of the bag proved to be difficult to get around the snaps and Cindy had to whip out the zipper foot – who knew a sewing machine had so many foots? I had used a walking foot, edge foot, what’s-the-word-for-a-regular-foot, and now a skinny little zipper foot.)

Hard at Work on the Bernina
We also made some nice pockets to hold all sorts of things, especially my i-phone. Here I am, just sewing away on Cindy’s Bernina. This thing is as old as her daughter and works great. It was one of the first computerized Berninas. Just goes to show you when you buy quality, it lasts a long time. Amen.
I sewed the lining almost all the way closed except for an opening at the bottom. And, of course, the top was left open (this is where it would attach to the top of the bag, which is obviously open.) Next up was to pin the lining to the bag. So with the bag standing upright

Pinning the Lining to the Bag
with the right side facing out, Cindy pinned the lining to the bag right sides together. So in this pic, the lining actually looks inside out. Remember that part I didn’t sew? That was because after the lining gets attached to the bag, we will need to pull the whole bag through that opening so that the lining would eventually be *inside* the bag. Sounds confusing, but now that I have seen how it is done, I get it. I doubt I did you any favors trying to explain this right now! (sorry!!)

Bag Before Lining Was In
We were nearing the finish line and my heart started a thump thump thumpin’… I was actually excited and kind of sad at the same time because all the fun in making this bag was quickly coming to an end 😦 Here is how the bag looked BEFORE we put the lining in…
And then the BIG FINISH! (any Broadcast News fans out there?)…..

My Easy Summer Tote by Cindy Luby Designs & using Dear Stella Fabric.

Love a Bag with Lots of Interior Pockets!

My day job (when I freelance) is meteorologist. So this Dear Stella Town & Country Multi Umbrellas Fabric is a home run 🙂
